


Constructing a 3D Printer [Prusa I3]
SECTION 7 - Fine Calibration & Software - Page 3
Section 1 - Wooden frame : part 1 - part 2 - part 3Section 2 - Y Axis : part 1 - part 2 - part 3
Section 3 - X-Z axis : part 1 - part 2
Section 4 - Extruder : part 1 - part 2 - part 3
Section 5 - Electronics : part 1 - part 2 - part 3
Section 6 - Coarse Calibration & Software : part 1 - part 2 - part 3
Section 7 - Fine Calibration & Software : part 1 - part 2 - [[ part 3 ]]
Section 8 - Extras : part 1 - part 2 - part 3
Section 9 - Maintenance & Modding : part 1 - part 2
In this page we will see the Cura slicer.
Cura can be used as a host like Repetier-Host but i prefer using it only as a slicer.
You can drag and drop your stl file and then from "File" > "Save GCode" you can generate your gcode file.
Let's start configuring Cura for our machine.
From "File" > "Machine settings" we do like the photo below :
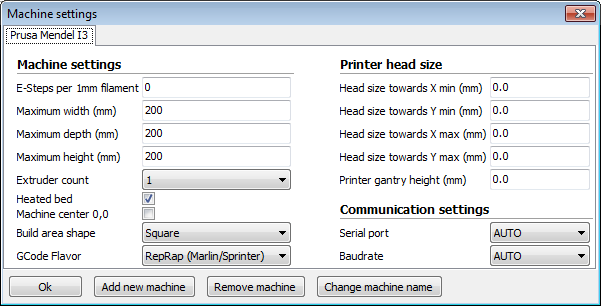
Esteps per 1 mm filament 0
Amount of steps per mm filament extrusion. Use 0 in order to ignore this value and use the firmware one.
Maximum width : 200mm
Maximum depth 200mm
Maximum height 200mm
Extruder count : 1
Heated bed : true
Machine center 0,0 : unchecked
Buid shape : square
Gcode flavor : Marlin
Printer head sizes : useful for printing sequential objects leave all these values at 0.0 for now
It is similar as "Sequential printing" in Slic3r.
Communication settings :
Serial port : AUTO
Baudrate : AUTO
Basic tab :

Layer height : 0.2mm
The distance that the extruder moves between each layer.
For a 0.4mm nozzle we have : Normal Quality : 0.24mm
Good Quality : 0.2mm
Better Quality : 0.16mm
Best Quality : 0.1mm
Shell thickness : 0.4 (nozzle_width) * 3 (perimeters) = 1.2mm
Assuming that layer width = nozzle diameter then
shell thickness = nozzle diameter * number of perimeters
3 perimeters is a good starting point
This setting is similar to the "perimeters" in Slic3r.
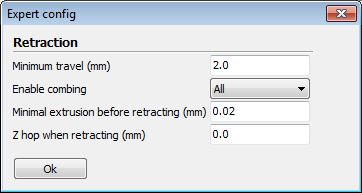
Enable retraction : true
Minimum travel : 2.0mm
Minimum amout of travel needed to "enable" retraction (similar to the "Minimum travel after retraction" that had slic3r)
Enable combing : all
Combing is the act of avoiding holes in the print for the nozzle to travel over.
All : enable combing on all surfaces
Off : the nozzle moves from start point to end point always retracting.
No skin : enables combing on all surfaces but skin surfaces.
Minimal extrusion before retracting : 0.02 mm
The minimal amount of extrusion that needs to be done before retracting again if a retraction needs to happen before this minimal is reached the retraction is ignored. This avoids retracting a lot of on the same piece of filament which flatetns the filament and causes grinding issues.
Z-hop when retracting : 0.0 mm
When a retacion is done the nozzle is lifted by this amount to travel over the print. This is similar to lift Z on slic3r. Avoid this setting for our machine.
Top/bottom thickness : 0.8 mm (0.2 layer height * 4 solid layers = 0.8mm)
This controls the thickness of the top and bottom layers.
The amount of solid layers put down is calculated by the layer height thickness and this value.
Having this value a multiple of the layer height make sense.
And keep it near to wall thickness to make the part evenly strong.
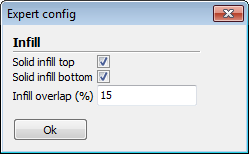
Fill density : 20%
This controls how densely filled the insides of your print will be.
Solid infill top : true
Create a solid bottom surface. If false the top is filled with the fill density value. Useful for cups/vases
Solid infill bottom : true
Create a solid bottom surface. If false the bottom is filled with the fill density value. Useful for buildings
Infill overlap : 15%
Amount of overlap between the infill and the walls. The walls are connected with the infill using this overlap.
Print speed :
Slow speed : 40mm/s
Normal speed : 60mm/s
Fast speed : 80mm/s
Printing temperature : 200 degrees
Bed temperature : 30 degrees
Support type : Touching buildplate
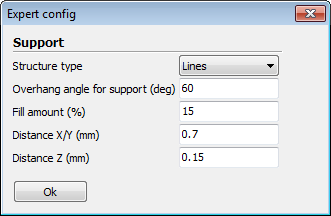
Structure type : Lines
Overhang angle 60 degrees
90 degrees is horizontal - 0 is vertical.
If at overhang test you print the "30 teeth" easily then set this at 90-30=60.
Fill amount : 15%
Amount of infill structure in the support material.
Less material gives weaker support which is easier to remove.
Distance X/Y : 0.7mm
Distance of the support material from the print in the X/Y directions.
Distance Z : 0.15 mm
Distance of the support material from the print in Z direction.
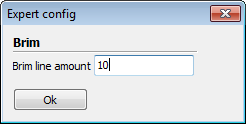
Platform adhesion type : Brim
Different options to prevent corners from lifting due to warping.
Brim add a single layer thick flat area around the object which is easy to remove.
Raft adds a thick raster below the object and a thin interface between this and your object. (not recommended) Enabling brim or raft skirt becomes disabled.
Brim line amount : 10 (means 10*0.4 layer width = 4mm)
The amount of lines used for brim. More lines better adhesion but less build area for your print.
Filament Diameter : 1.71 mm
Flow : 100.0%
Is the same as the "Extrusion multiplier" in Slic3r.
extrusion multiplier (flow) = slic3r layer width/measured width
This value effects the e-steps.
Instead using this value it is better to finetune your e-steps. For small changes on extruder steps you can slightly change this value. (In overhangs is useful adjusting this value to 101.0% over-extrude)
Advanced tab :
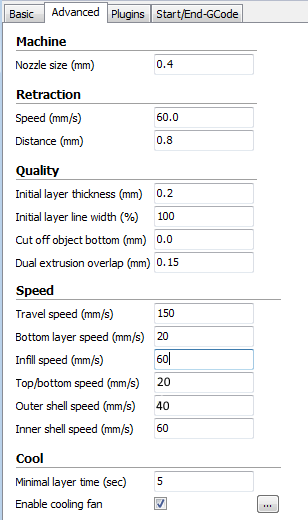
Nozzle size : 0.4 mm
Retraction speed : 60mm/s
A higher retraction works better but grinds and stresses the filament.
Retraction distance : 0.8mm
For direct hotends 0.75-2mm of retraction is a good reange to investigate.
For bowden printers you have to use 4-6mm instead.
Initial layer thickness : 0.2 mm
Layer height of the first layer. Stick with a 0.2 mm
Initial layer width : 100%
Layer width of the first layer will be 100% of the nozzle diameter. (0.4mm)
Cut off object bottom: 0.0mm
Sinks the object into the heatbed.
Dual extrusion overlap : 0.15mm
Bonds different colors together.
Travel speed :
Slow speed : 130mm/s
Normal speed : 150mm/s
Fast speed : 180mm/s
Bottom layer speed : 20mmm/s
Use a slow speed in order to stick better the object into the heatbed.
It is similar with the "First layer speed" at slic3r.
Infill speed :
Have to be similar to the printing speed.
Slow speed : 50mm/s
Normal speed : 60mm/s
Fast speed : 70mm/s
Top bottom speed :
Slow speed : 15mm/s
Normal speed : 20mm/s
Fast speed : 30mm/s
Outer shell speed :
Improves the skin quality if it is slower
Slow speed : 30mm/s
Normal speed : 40mm/s
Fast speed : 50mm/s
Inner shell speed : Must be between Outer shell speed and infill/printing speed.
Slow speed : 50mm/s
Normal speed : 60mm/s
Fast speed : 60mm/s
Cool minimal layer time : 5sec
Minimum time to spent in the layer.
5 good value if you have a fan / 30 default value.
Gives the layer time to cool down before next layer is put on top.
Enable cooling fan : (disabled : in most cases if you have a fan / enabled : if you do not have a fan or you do bridges/overhangs).
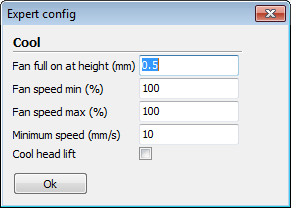
Fan full at height : 0.5 mm (indifferent for our case)
Fan speed min : 100% (indifferent for our case)
Fan speed max : 100% (indifferent for our case)
Minimum speed : 10mm (important)
30mm/s(good value if you have a fan) / 10mm/s (default value)
The minimal layer time can cause the print to slow down so much it starts to ooze.
The minimal feedrate prevent this. Even if a print get slowed down it will never be slower than this minimal speed.
Cold head lift : no
Lift the head if the minimal speed is hit because of cool slowdown and wait the extra time so the minimal layer time is always hit.
At Start/End GCode tab you can add at the "end.gcode" the song like we did in slic3r
"Expert" > "Open expert settings" As you can see almost all sections are already set.
Notice that skirt is ignored while brim is active.
Since Brim is a must then ignore skirt.
Under Black magic :
Spiralize the outer contour : disabled
Spiralize is smoothing out the Z move of the outer edge.
This will create a steady Z increase over the hole print.
This feature turns a solid object into a single walled print with a solid bottom.
Is used to called Joris. In slic3r is called "Spiral vase"
Only follow mesh surface : disabled
Only follow the mesh surface of the 3D model do not do anything else. No infill no top no bottom.

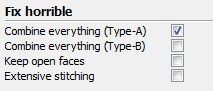
Under Fix horrible :
All 4 options work on the 2D slices not on the 3D model.
In detail, Combine Everything tries to do a CSG (Constructive solid geometry) boolean union with everything.
It can do this in two different ways, with(Type-A) or without normals(Type-B).
If it ignores normals (Type-B) it will remove any internal holes you see on a layer.
So a cube with a straight hole downwards in it becomes a cube.
While a cube with a hole from side to side will remain the same.
Combine everything Type-A : checked
This option adds all parts of model together.
The result is usually that internal cavities dissapear.
This can be intended or not. Type A is dependant on the model normals and tries to keep some internal holes intact.
Combine everything Type-B : unchecked
This option adds all parts of model together.
The result is usually that internal cavities dissapear.
This can be intended or not.
Type B ignores all internal holes and only keeps the outside shape per layer.
By checking this setting the Type-A setting is ignored.
"Keep open faces" happens in a step before "Combine everything".
What Cura does at first, is taking a knife and slicing your model into tiny slices.
Each slice is a layer.
But, 3D models are never perfect, so what I end up with is a lot of small line segments in a 2D plane.
The next thing I do is joining up small gaps between the line segments, and any line segment that makes a full circle is stored for later reference.
Any line segment that fails to make a full circle is normally discarded.
unless you have this option checked, then it makes a line from one end to the other to close up the line.
Simple example would be to take a cube, remove one side from the cube, save it, load it in Cura.
It won't generate any GCode because no slice is closed, unless you check the "keep open faces" then it will effectively fake in the removed surface again.
Results may vary, and it usually works best in combination with "Type-B combine everything".
Keep open faces : unchecked
Keeps all open bits of the model intact.
Normally cura tries to stitch up (join) small holes and remove everything but big holes, but this option keeps bits that are not properly part of anything and just goes with whatever is left.
This option is usually not what you want, but it might enable you to slice models otherwise failing to produce proper paths.
"Extensive stitching" is something related to open surfaces, but not exactly.
Imagine you have this cube where you removed the side, and then you move this open cube with the opened up side against a larger cube.
From the outside this will look "solid" but in reality you have a big gaping hole and an internal surface that will cause issues.
Extensive stitching fixes this, it tries to find the partial internal surfaces, and the open parts and tries to stitch them together so they form a solid outside.
Extensive stitching : unchecked
Tries to fix up open holes in model by closing the hole with touching polygons. This algorithm is expensive and could introduce a lot of processing time.
You can now save your settings by doing "File" > "Save Profile..."
Try slicing some models with Cura and compare it with Slic3r.
I am using Slic3r more but i always use Cura as "backup" slicer.
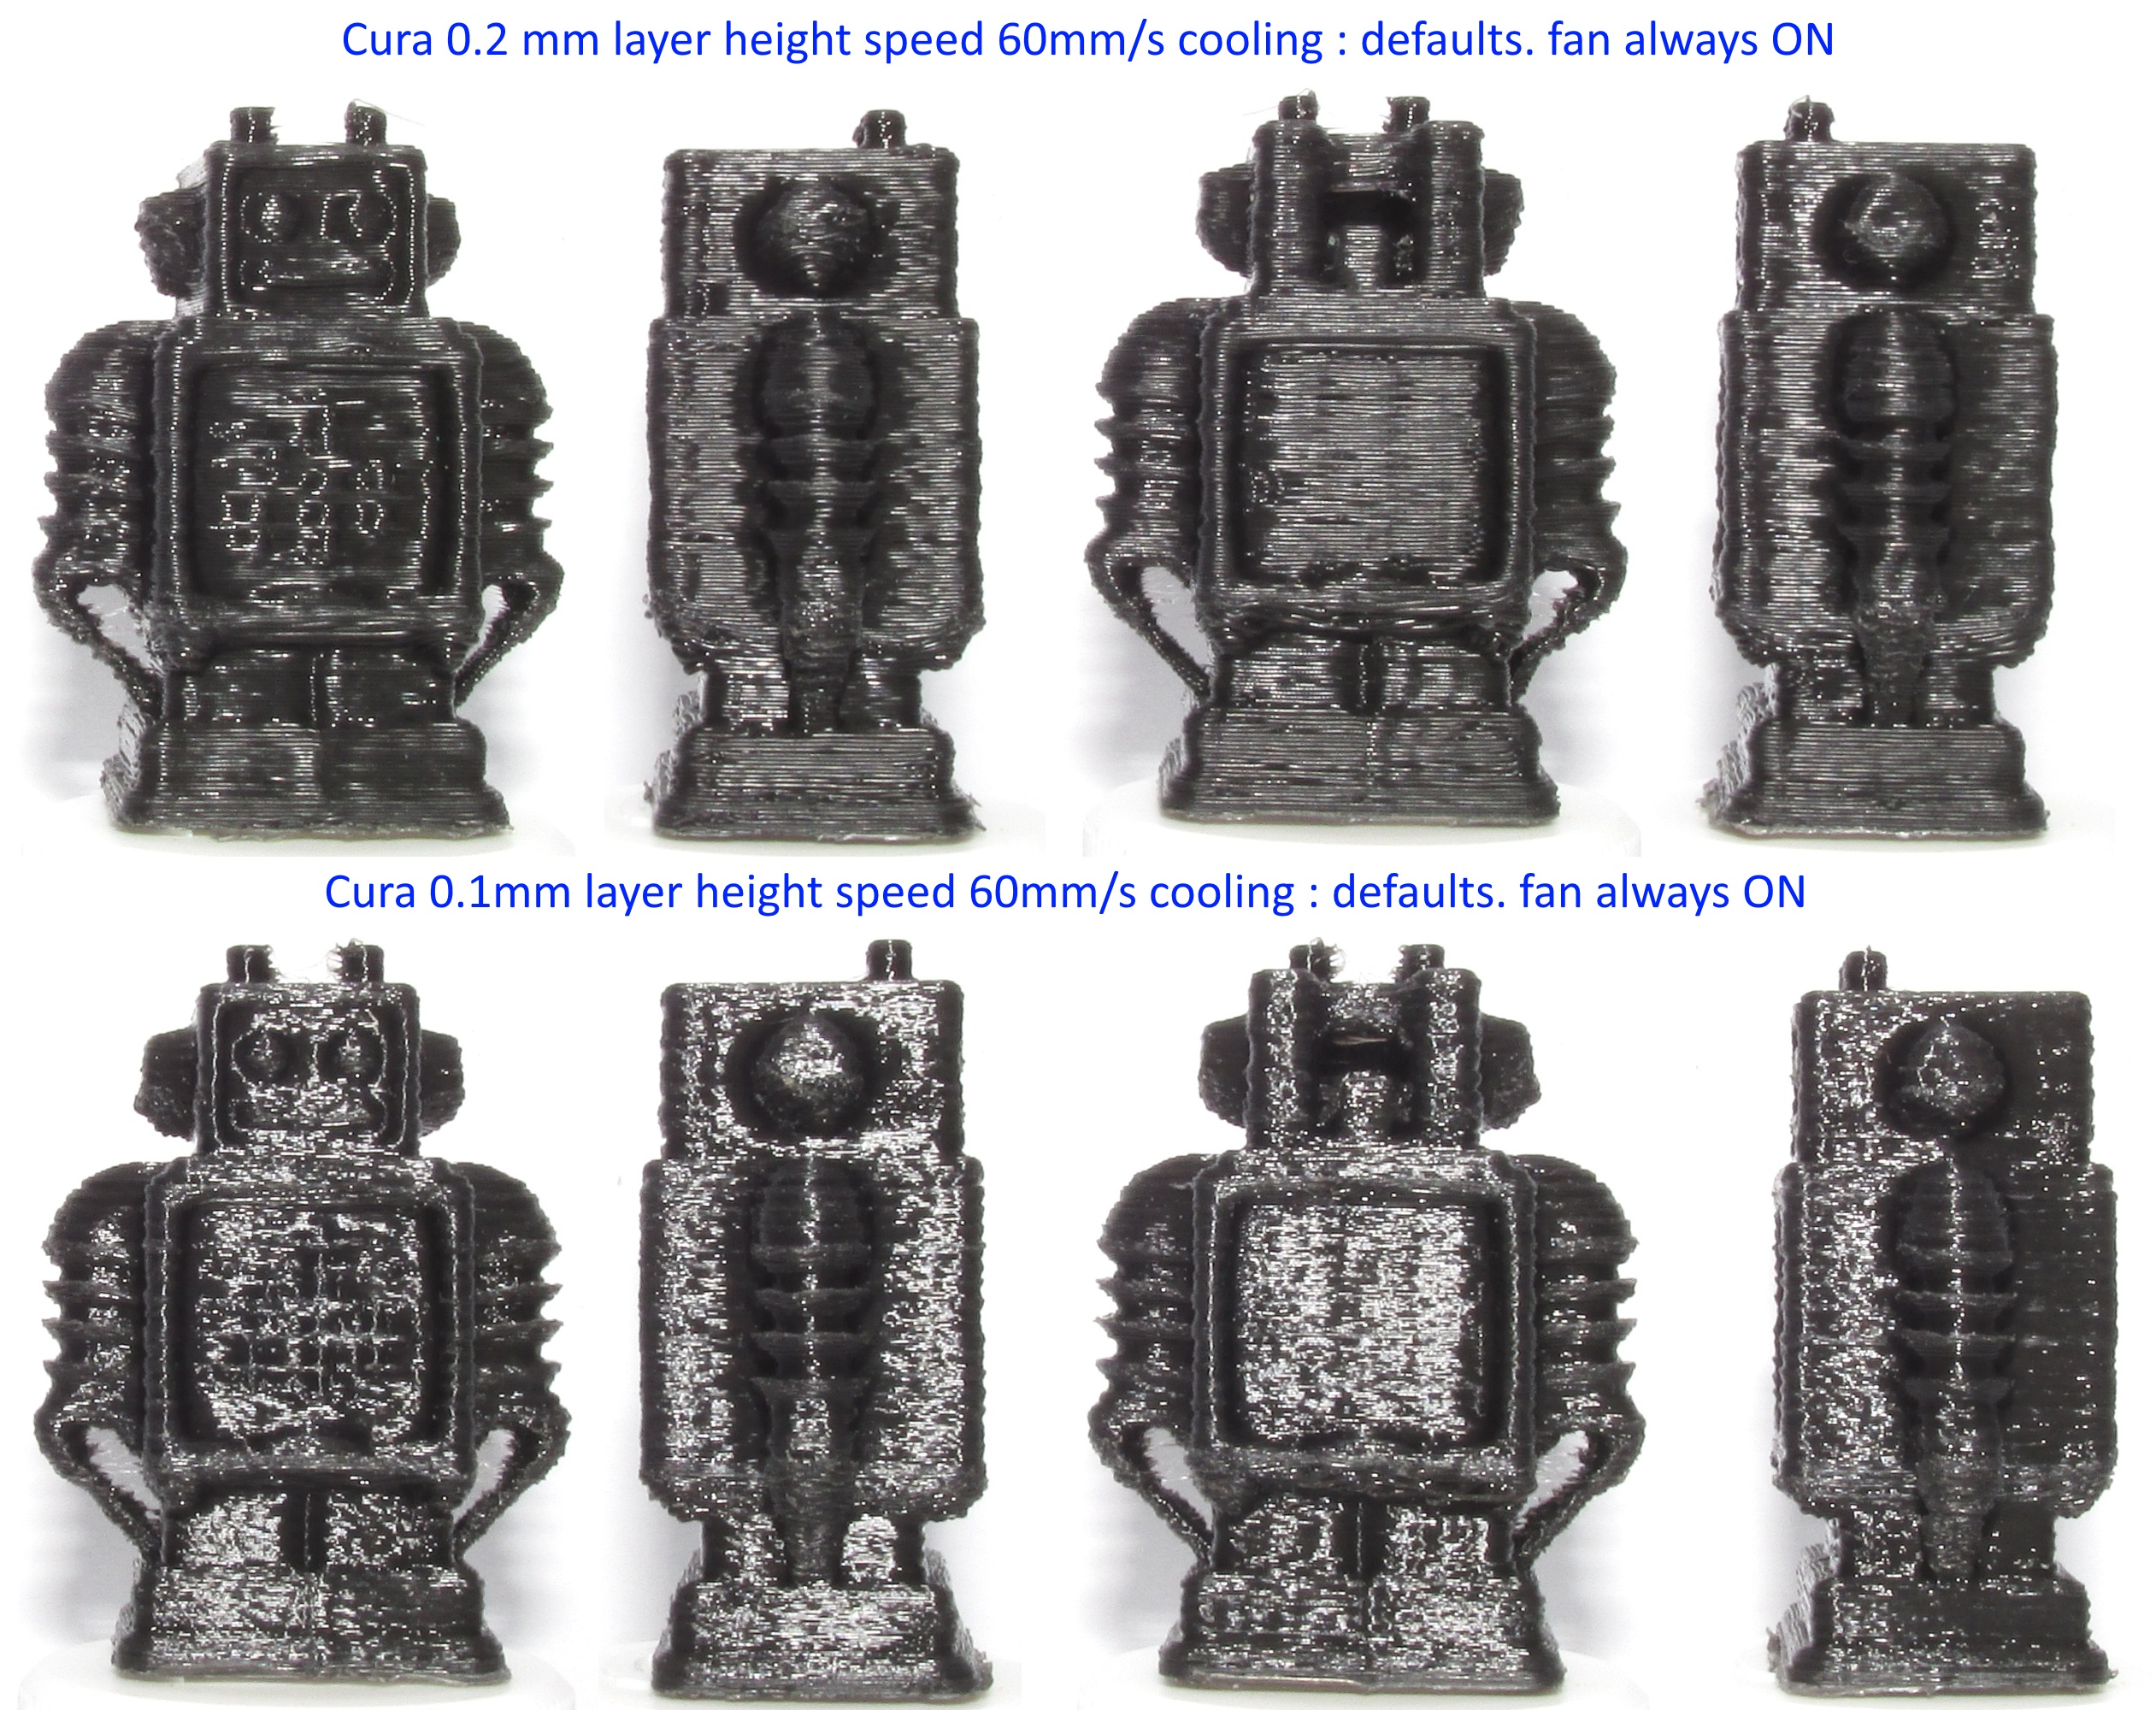
Below is the overall robot test of cura.
Like before i noticed overheating at 0.1 mm layer height and a little ooze so i might increment the retracion distance at 1mm or even more.
I have used 3 perimeters (1.2mm shell thickness) and normal speeds.
Below we can see all robots for slic3r and cura.
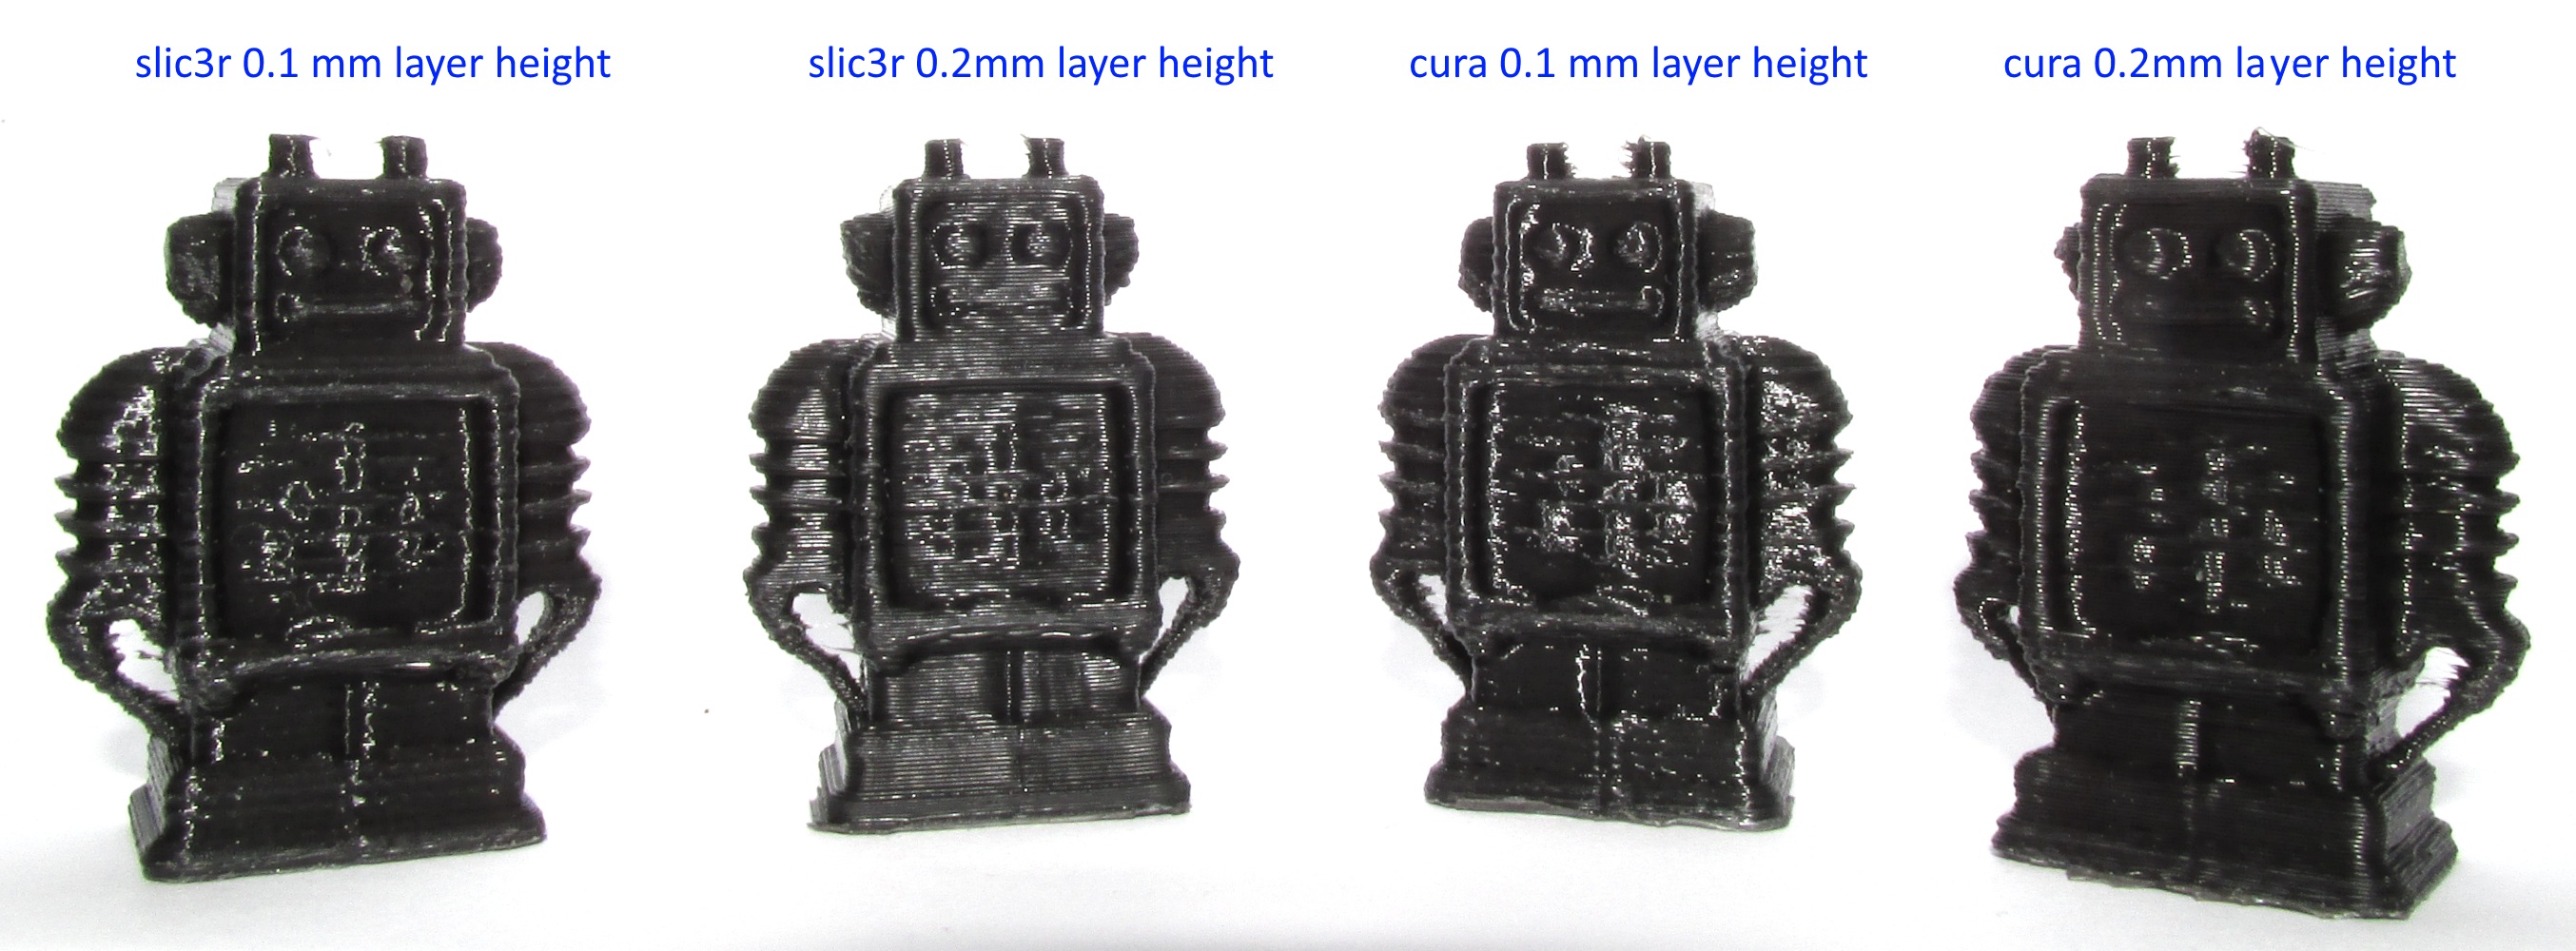
Do not hesitate to reprint the tests again and again till you calibrate your machine.
Below is an image with all my tests for this tutorial.
Total weight 210gr of PLA.

From now on we can start printing everything we want !
In the next section we will see some addons for our 3D printer like standalone printing and adding a fan.
Section 1 - Wooden frame : part 1 - part 2 - part 3
Section 2 - Y Axis : part 1 - part 2 - part 3
Section 3 - X-Z axis : part 1 - part 2
Section 4 - Extruder : part 1 - part 2 - part 3
Section 5 - Electronics : part 1 - part 2 - part 3
Section 6 - Coarse Calibration & Software : part 1 - part 2 - part 3
Section 7 - Fine Calibration & Software : part 1 - part 2 - [[ part 3 ]]
Section 8 - Extras : part 1 - part 2 - part 3
Section 9 - Maintenance & Modding : part 1 - part 2