3.2 CSS code
CSS stands for Cascading Style Sheets and help us to stylize our HTML pages. Before starting to edit our CSS would be useful to talk about the gaps because it is the only thing that might is not 100% clear and can make you lose a lot of time understanding it.
fig:07 CSS Gaps
- The gap 1 : padding
- The gap 2 : border-width
- The gap 3 : margin

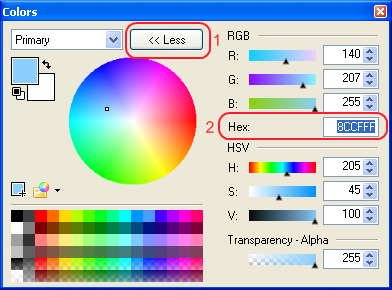
fig:08 Paint.Net Color Picker
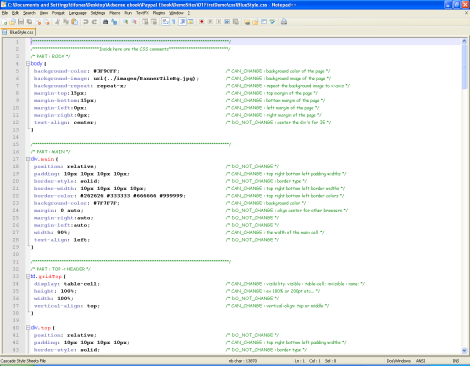
Now we are ready to edit our CSS style. Use notepad++ to open the 'BlueStyle.css' located at
'DemoSites\01FirstDemo\css'. You will get a nice self explanatory page with a lot of comments.

fig:09 CSS General View
The comments on CSS are written like this : '/* ... */'. The comments are important since we can disable a part of the code of our CSS. Let's say we want to disable the bakground image, we just have to modify the listing "background image enabled" to listing "background image disabled"
 background-image: url(../images/Bg.jpg);
 /* CAN_CHANGE : background image of the page */
Listing enabled
 /* background-image: url(../images/Bg.jpg); */
 /* CAN_CHANGE : background image of the page */
Listing disabled
The comments have green color the page attributes blue and the values of that attributes black. We have to edit only the black values (attributes) if we want. The CSS of the FirstDemo has these sections :
- PART : BODY From here we can change the style of the page.
- PART : MAIN Modifies the main table (gray).
- PART : TOP - HEADER Modifies the header.
- PART : LEFT - MENU LEFT Modifies the left column
- PART : CENTER - CONTENT Modifies the center page
- PART : RIGHT - MENU RIGHT Modifies the right column
- PART : BOTTOM - FOOTER Modifies the footer
- FONTS small, normal, big and very big. Modifies the fonts (size, color, family...). We have four families of fonts : small, normal, big and very big.
- LINKS small, normal, big, very big and menu Modifies the links (size, color, family...). We have five families of links : small, normal, big, very big and menu.
- Each link has four states : link, visited, active and hover link : Defines the style for normal unvisited links.
visited : Defines the style for visited links.
active : Defines the style for active links. A link becomes active once you click on it.
hover : Defines the style for hovered links. A link is hovered when the mouse moves over it.
The two projects are identical, we only have changed some CSS values. We did not wanted the left and the right panel so we did the change below to the respective panels :
display: table-cell;Enable palnel
display: none;Disable panel
Then we went to the CENTER section of the CSS and we modified : the width , the padding , the border-width , the margin, and the background color:
/* PART : CENTER -> CONTENT */
td.gridCenter {
 display: table-cell;
 /* CAN_CHANGE : visibility.
 visible : table-cell; invisible : none; */
 width: 100%;
 /* CAN_CHANGE : width percentage.
 WidthLeft+WidthCenter+WidthRight=100% */
 vertical-align: top;
 /* CAN_CHANGE : vertical-align: top or middle */
}
div.center {
 position: relative;
 /* DO_NOT_CHANGE */
 padding: 3px 3px 3px 3px;
 /* CAN_CHANGE :
 top right bottom left padding widths */
 border-style: solid;
 /* DO_NOT_CHANGE : border type */
 border-width: 0px 0px 0px 0px;
 /* CAN_CHANGE :
 top right bottom left border widths */
 border-color: #0000FF #0000CC #000099 #000066;
 /* CAN_CHANGE :
 top right bottom left border colors */
 margin: 0px 0px 0px 0px;
 /* CAN_CHANGE :
 top right bottom left margin widths */
 background-color: #8CCFFF;
 /* CAN_CHANGE : background color */
}
Center panel
Then we edited the HEADER section of the CSS and we modified : the padding , the border-width , the border color, and the background color:
/* PART : TOP -> HEADER */
td.gridTop {
 display: table-cell;
 /* CAN_CHANGE : visibility.
 visible : table-cell; invisible : none; */
 height: 100%;
 /* CAN_CHANGE : ex 100% or 200pt etc... */
 width: 100%;
 /* DO_NOT_CHANGE */
 vertical-align: top;
 /* CAN_CHANGE : vertical-align: top or middle */
}

div.top {
 position: relative;
 /* DO_NOT_CHANGE */
 padding: 0px 0px 0px 0px;
 /* CAN_CHANGE :
 top right bottom left padding widths */
 border-style: solid;
 /* DO_NOT_CHANGE : border type */
 border-width: 0px 0px 1px 0px;
 /* CAN_CHANGE :
 top right bottom left border widths */
 border-color: #00FF00 #00CC00 #0000FF #006600;
 /* CAN_CHANGE :
 top right bottom left border colors */
 margin: 0px 0px 0px 0px;
 /* CAN_CHANGE :
 top right bottom left margin widths */
 background-color: #8CCFFF;
 /* CAN_CHANGE : background color */
}
Header panelThen we edited the FOOTER section of the CSS and we modified : the padding , the border-width , the border color, and the background color:
/* PART : BOTTOM -> FOOTER */
td.gridBottom {
 display: table-cell;
 /* CAN_CHANGE : visibility.
 visible : table-cell; invisible : none; */
 height: 100%;
 /* CAN_CHANGE : ex 100% or 200pt etc... */
 width: 100%;
 /* DO_NOT_CHANGE */
 vertical-align: top;
 /* CAN_CHANGE : vertical-align: top or middle */
}
div.bottom {
 position: relative;
 /* DO_NOT_CHANGE */
 padding: 0px 0px 0px 0px;
 /* CAN_CHANGE :
 top right bottom left padding widths */
 border-style: solid;
 /* DO_NOT_CHANGE : border type */
 border-width: 1px 0px 0px 0px;
 /* CAN_CHANGE :
 top right bottom left border widths */
 border-color: #0000FF #E5E5E5 #CCCCCC #B2B2B2;
 /* CAN_CHANGE :
 top right bottom left border colors */
 margin: 0px 0px 0px 0px;
 /* CAN_CHANGE :
 top right bottom left margin widths */
 background-color: #8CCFFF;
 /* CAN_CHANGE : background color */
}
Footer panelLastly we edited the MAIN section of the CSS modifying : the padding, the border-width, the border color, the background color and the width:
/* PART : MAIN */
div.main {
 position: relative;
 /* DO_NOT_CHANGE */
 padding: 0px 0px 0px 0px;
 /* CAN_CHANGE :
 top right bottom left padding widths */
 border-style: solid;
 /* DO_NOT_CHANGE : border type */
 border-width: 1px 1px 1px 1px;
 /* CAN_CHANGE :
 top right bottom left border widths */
 border-color: #0000FF #0000FF #0000FF #0000FF;
 /* CAN_CHANGE :
 top right bottom left border colors */
 background-color: #8CCFFF;
 /* CAN_CHANGE : background color */
 margin: 0 auto;
 /* DO_NOT_CHANGE :
 align center for other browsers */
 margin-right:auto;
 /* DO_NOT_CHANGE */
 margin-left:auto;
 /* DO_NOT_CHANGE */
 width: 70%;
 /* CAN_CHANGE : the width of the main cell */
 text-align: left;
 /* DO_NOT_CHANGE */
}
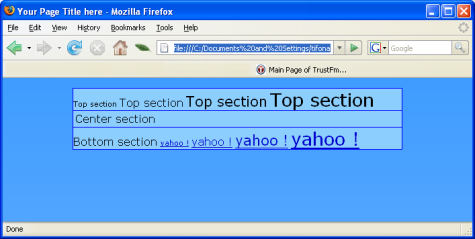
Main panelBelow you can see the result of the Second Demo. As you can see at the figure fig:10 we obtained a better result but this is only the begging.

fig:10 Second Demo
Note that the index.html contains the link of the CSS so if you want to try more CSS styles just create more CSS files with different names and link them to the HTML page. For example it is created the 'BlueStyle2.css'. The difference from 'BlueStyle.css' is that it is changed the background image.
 background-image: url(../images/Bg2.jpg);
 /* CAN_CHANGE : background image of the page */
BlueStyle2.css
Now we copied the index.html to index2.html and at index2.html we changed the linked CSS.
 <LINK href="css/BlueStyle2.css"
 rel="stylesheet" type="text/css">
index2.html
So you can have a CSS for each page html but this solution generally is not recommended.

fig:11 Second Demo With Different CSS
Resuming : You do not have to write a CSS from scratch you only have to modify the attributes of the given one. Like the html case the 'BlueStyle.css' can be considered the father of the CSS. Later we will add some variations of 'BlueStyle.css'. After reading this subsection, you should be capable to edit CSS's and make your styles for your website. Do not forget to change the font and links attributes too, in base of your needs, of course.