Configure a Dedicated Server with Webmin
Part 07 - Let's Encrypt
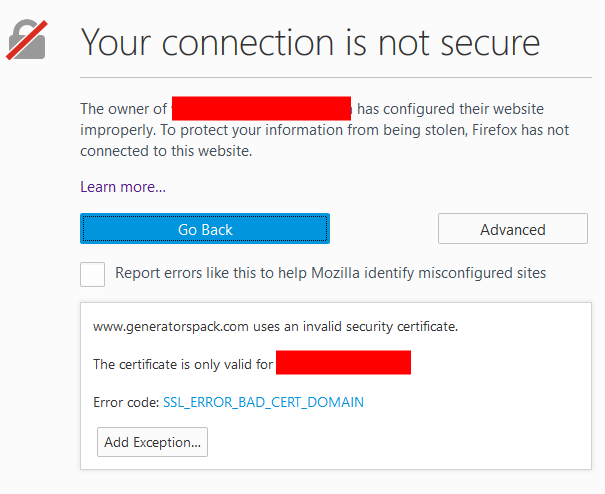
01-Introduction - 02-Installing Webmin - 03-Configure DNS - 04-Assign Nameservers - 05-Configure SFTP - 06-Setup Web server - [[ 07-Let's Encrypt ]] - 08-Setup Perl/CGI PHP - 09-Manage MySQL - 10-Setup Email server - 11-Setup SASL - 12-Setup Email accounts - 13-Email process - 14-Email antivirus - 15-Usermin - 16-ExtrasWe have successfully configured our Apache web server but if we are going to access into our SSL web sites (including Webmin) we always going to get a "Your connection is not secure" alert.
Webmin has generated a SSL but this certificate is not trusted because the issuer certificate is unknown (is you).
For you this is not a problem since you can skip this alert but your users almost certainly will not trust your website.
You have to get a SSL from a trusted issuer of certificates.
We will cover "Let's Encrypt" since it is the only free of charge issuer available right now.
Webmin supports natively Let's encrypt !
Installing Python 2.7 in Centos 6.x
Log in as root using PuTTY.First of all we have to install Epel Repository:
yum install epel-release
Install IUS Repository with the command below:
rpm -ivh https://rhel6.iuscommunity.org/ius-release.rpm
Finally install Python 2.7 and Git:
yum --enablerepo=ius install git python27 python27-devel python27-pip python27-setuptools python27-virtualenv -y
SSL Creation
Navigate at Webmin > Webmin Configuration > SSL Encryption icon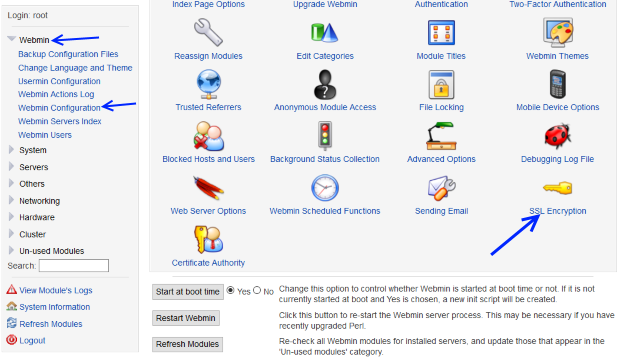
Click over the "Let's Encrypt" tab.
We are going to use one certificate for our first website and for our Webmin login page.
Fill the "Options for new SSL certificate" like this:
Hostnames for certificate :
111.111.111.111 (should be written automatically)
www.website1.com
"Website root directory for validation file" select A different Apache virtual host : website1.com
Copy new key and certificate to Webmin? Yes
Months between automatic renewal : 1
111.111.111.111 (should be written automatically)
www.website1.com
"Website root directory for validation file" select A different Apache virtual host : website1.com
Copy new key and certificate to Webmin? Yes
Months between automatic renewal : 1
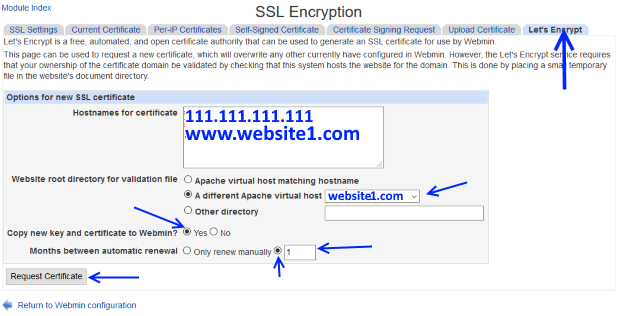
Press the "Request Certificate" button and wait.
This operation should generate these files :
SSL certificate: /etc/webmin/letsencrypt-cert.pem
SSL private key: /etc/webmin/letsencrypt-key.pem
Chained CA certificate: /etc/webmin/letsencrypt-ca.pem
SSL private key: /etc/webmin/letsencrypt-key.pem
Chained CA certificate: /etc/webmin/letsencrypt-ca.pem
If you want to apply a second SSL for a second website like website2.com do like below:
Click over "Let's Encrypt" tab like before.
Fill the "Options for new SSL certificate" like this:
Hostnames for certificate : www.website2.com
"Website root directory for validation file" select A different Apache virtual host : website2.com
Copy new key and certificate to Webmin? No
Months between automatic renewal : 1
"Website root directory for validation file" select A different Apache virtual host : website2.com
Copy new key and certificate to Webmin? No
Months between automatic renewal : 1
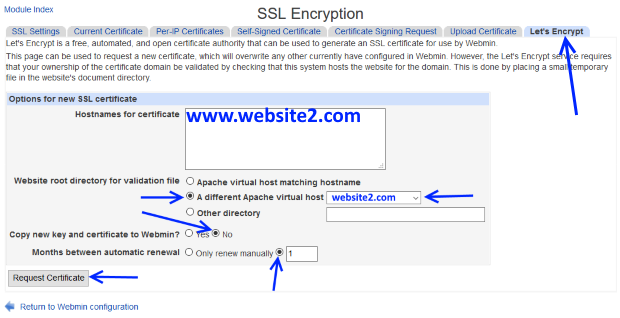
Press the "Request Certificate" button and wait.
This operation should generate these files :
SSL certificate: /etc/webmin/webmin/www.website2.com.cert
SSL private key: /etc/webmin/webmin/www.website2.com.key
Chained CA certificate: /etc/webmin/webmin/www.website2.com.chain
SSL private key: /etc/webmin/webmin/www.website2.com.key
Chained CA certificate: /etc/webmin/webmin/www.website2.com.chain
Let's encrypt certificates are valid for three months.
You can always repeat this process in order to refresh them.
Apply SSL certificates
Navigate at Severs > Apache Webserver.From the virtual server list select: website1.com Port 443

Now click over the icon SSL Options
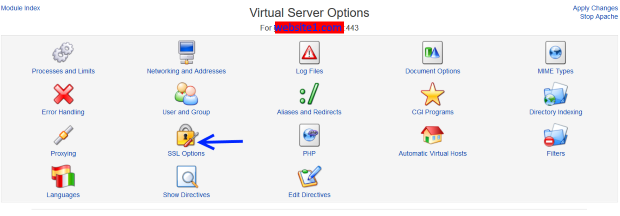
Fill the "SSL Options" form like below:
Certificate/private key file:
from: /etc/pki/tls/certs/localhost.crt
to: /etc/webmin/letsencrypt-cert.pem
or: /etc/webmin/webmin/www.website1.com.cert
Private key file:
from: /etc/pki/tls/private/localhost.key
to: /etc/webmin/letsencrypt-key.pem
or: /etc/webmin/webmin/www.website1.com.key
from: /etc/pki/tls/certs/localhost.crt
to: /etc/webmin/letsencrypt-cert.pem
or: /etc/webmin/webmin/www.website1.com.cert
Private key file:
from: /etc/pki/tls/private/localhost.key
to: /etc/webmin/letsencrypt-key.pem
or: /etc/webmin/webmin/www.website1.com.key
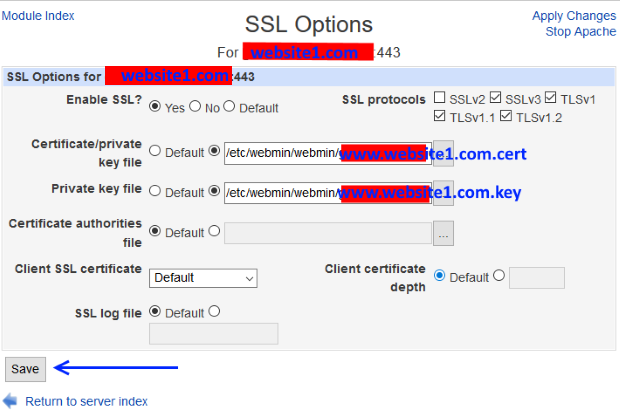
Press the "Save" button.
Repeat the same procedure for the website2.com.
For the website2 fill the "SSL Options" form like below:
Certificate/private key file:
from: /etc/pki/tls/certs/localhost.crt
to: /etc/webmin/webmin/www.website2.com.cert
Private key file:
from: /etc/pki/tls/private/localhost.key
to: /etc/webmin/webmin/www.website2.com.key
from: /etc/pki/tls/certs/localhost.crt
to: /etc/webmin/webmin/www.website2.com.cert
Private key file:
from: /etc/pki/tls/private/localhost.key
to: /etc/webmin/webmin/www.website2.com.key
Finally press the "Apply changes" link and then
Stop and Start apache in order to refresh the server.
Test the SSL version of your site by going:
https://www.website1.com
This time your website should respond without and problems!
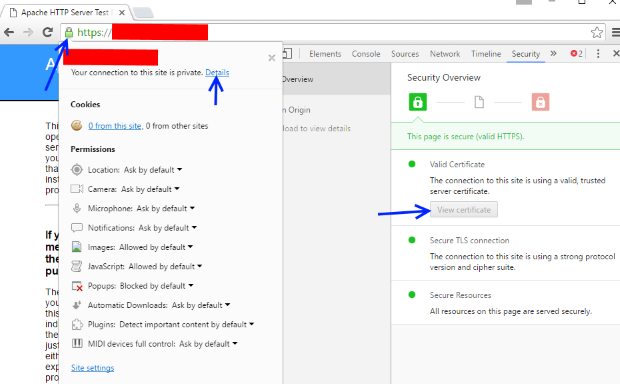
Notice that https://website1.com still gets "Your connection is not secure" alert.
This happens because for each domain name can have only one Let's encrypt SSL certificate.
In the next section we will see how to install server side scripting languages like Perl/CGI and PHP
01-Introduction - 02-Installing Webmin - 03-Configure DNS - 04-Assign Nameservers - 05-Configure SFTP - 06-Setup Web server - [[ 07-Let's Encrypt ]] - 08-Setup Perl/CGI PHP - 09-Manage MySQL - 10-Setup Email server - 11-Setup SASL - 12-Setup Email accounts - 13-Email process - 14-Email antivirus - 15-Usermin - 16-Extras