


Configure a Dedicated Server with Webmin
Part 03 - DNS Setup
01-Introduction - 02-Installing Webmin - [[ 03-Configure DNS ]] - 04-Assign Nameservers - 05-Configure SFTP - 06-Setup Web server - 07-Let's Encrypt - 08-Setup Perl/CGI PHP - 09-Manage MySQL - 10-Setup Email server - 11-Setup SASL - 12-Setup Email accounts - 13-Email process - 14-Email antivirus - 15-Usermin - 16-ExtrasThe Domain Name System (DNS) translates web domain names into IP.
You can consider Domain Name System (DNS) like a phone book.
The DNS maintain a domain name and translate it to an Internet Protocol (IP) address.
Bind is the most famous DNS Server for Linux.
Install BIND DNS Server
Webmin has the "BIND DNS Server" module located or at "Servers" section or at "Un-used Modules" section.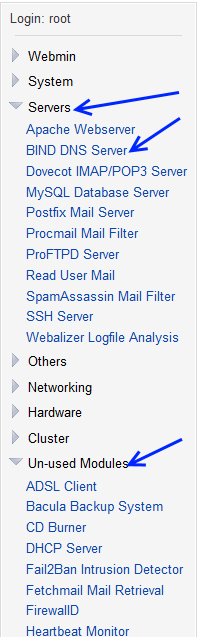
Click over the link "BIND DNS Server"
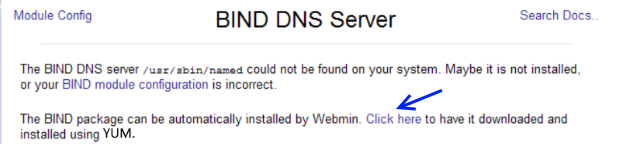
If the module is not installed press the "Click here" link indicated at the photo below :
Configure BIND DNS Server
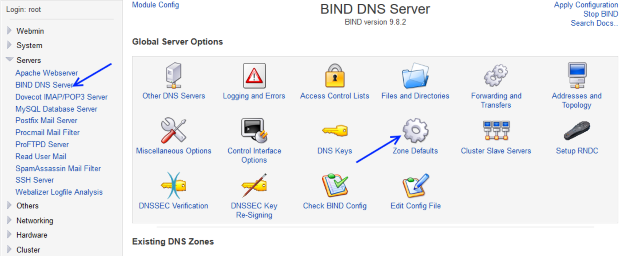
Once the module is installed go to:Servers > BIND DNS Server
First of all we have to configure BIND so that anyone can query our DNS Server.
If you are not on the main options screen, click on the left hand menu "BIND DNS Server".
Now click on "Zone Defaults" icon.
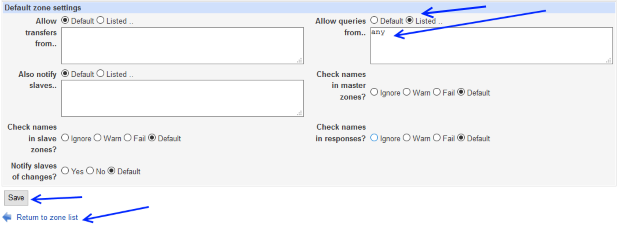
Under "Default Zone Settings", "Allow queries from" box, select "Listed" and change the box from "localhost" to "any".
Click on "Save"
Click on "Return to zone list" link at the bottom of the page.
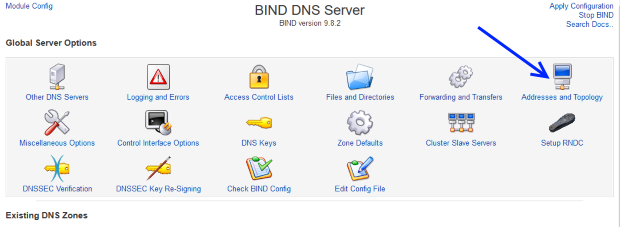
Now from the main BIND DNS Server menu click on "Addresses and Topology" icon.
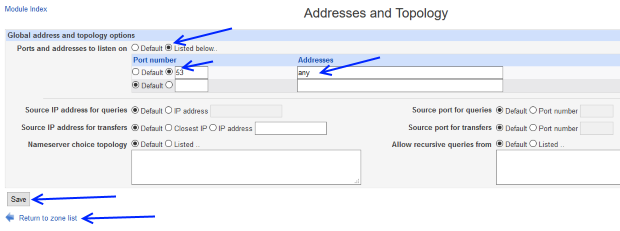
Under "Global address and topology options", at "Ports and address to listen on", select "Listed below".
In the first row, make sure that "Default" is not selected, instead the second radio box is selected. In the text box there should be "53" indicating that we are running DNS on port 53.
In the "Address" column, change the value to "any" to allow anyone to access this port (always first row).
Click on "Save" button.
Click the "Return to zone list" link
Create a zone
Once configured our BIND DNS Server it is time to create our first master zone.A zone is simply a portion of a domain.
If there are no subdomains like : subdomain.website1.com, then the zone and domain are the same.
In other case, each subdomain is considered a new zone.
There are two types of zones. Master and slave zones.
Master zone is a domain of which our BIND DNS Server is responsible for.
A Slave zone is a back up copy of a master zone that is located on another DNS Server.
We will focus only on master zones in this ebook since our BIND DNS Server will resolve the domain names into IPs.
Let's create for our domain (website1.com) a new master zone.
This zone will have :
- Five Address Records (A):
website1.com, ns1.website1.com, ns2.website1.com, ftp.website1.com, mail.website1.com - Two NameServer Records (NS):
ns1.website1.com, ns2.website1.com - One Name alias (CNAME): www that goes to website1.com
- One Create Mail Exchange Record (MX): mail.website1.com

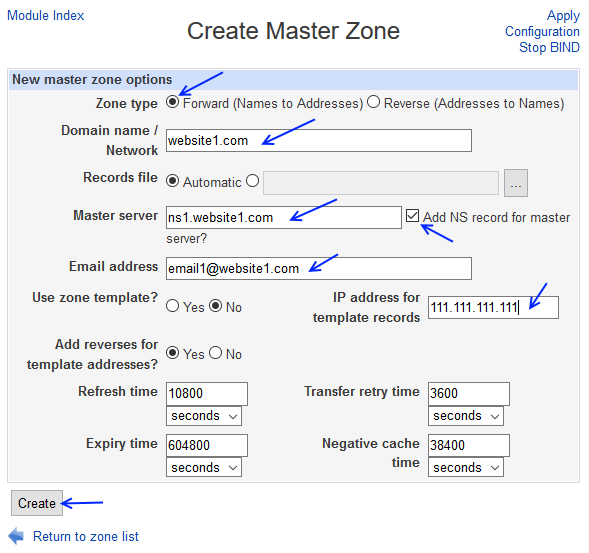
Fill the "Create Master Zone" like this :
Zone type : forward (Names to Addresses)
Domain name / Network : website1.com
Master server : ns1.website1.com
Add NS record for master : checked
Email address : email1@website1.com
IP address for template records : 111.111.111.111 (dedicated server IP).
Domain name / Network : website1.com
Master server : ns1.website1.com
Add NS record for master : checked
Email address : email1@website1.com
IP address for template records : 111.111.111.111 (dedicated server IP).
Hit "Create" button
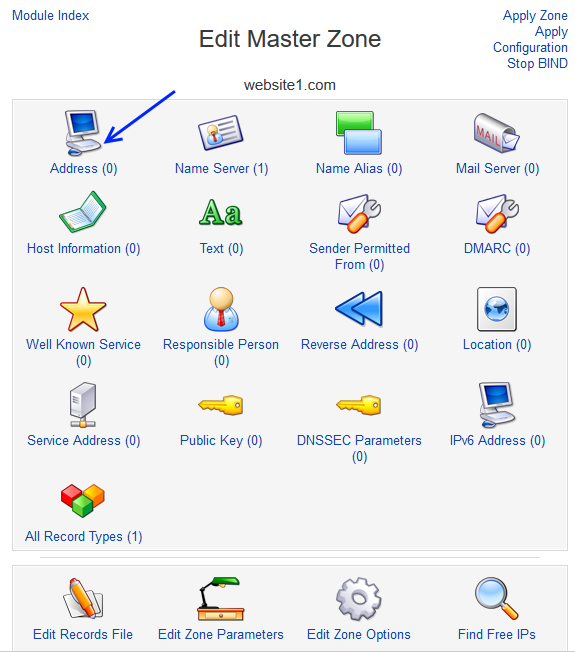
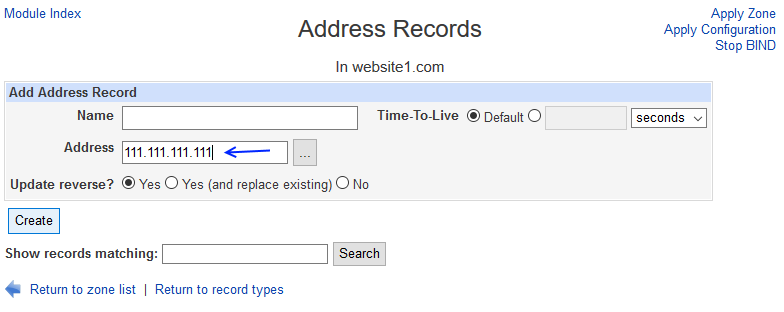
Now hit at the "Address" icon :
Fill the "Address Records" form like this :
Name : leave empty
Add the IP address 111.111.111.111 (dedicated server IP).
Add the IP address 111.111.111.111 (dedicated server IP).
Hit the "Create" button.
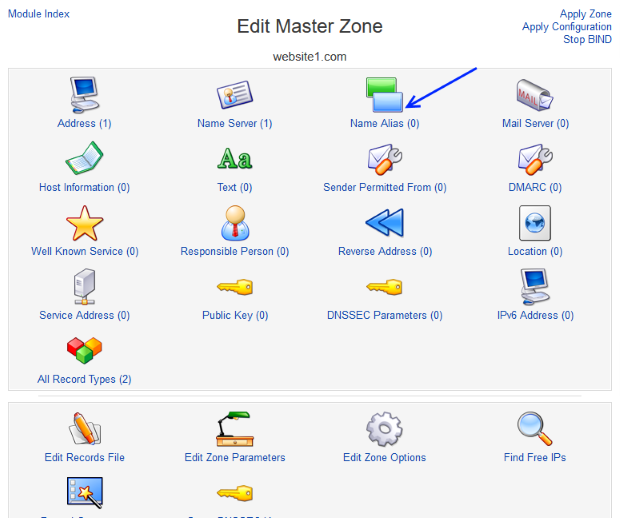
Now hit "Return to record types" link.
Hit over the "Name alias" icon
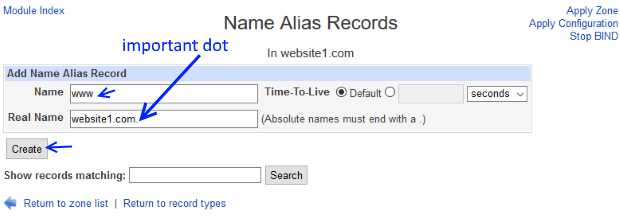
Fill the "Name alias Records" page like this :
Name : www
Real Name : website1.com. (IMPORTANT : Absolute names must end with a .)
Real Name : website1.com. (IMPORTANT : Absolute names must end with a .)
Hit the "Create" button.
Now hit "Return to record types" link.
Now click over "Address" icon again.
This time fill "Address Records" like this :
Name : ns1
Address : 111.111.111.111 (dedicated server IP).
Address : 111.111.111.111 (dedicated server IP).
Finally click the "Create" Button
Repeat the same procedure for :
- Name : ns2 , Address : 111.111.111.111 (dedicated server IP).
- Name : ftp , Address : 111.111.111.111 (dedicated server IP).
- Name : mail , Address : 111.111.111.111 (dedicated server IP).
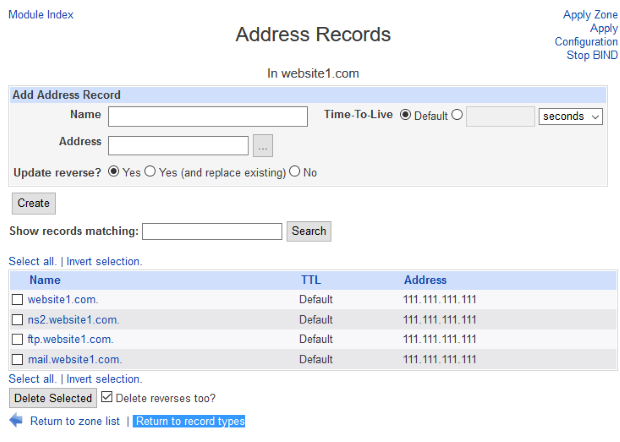
Click the "Return to record types" link.
We need to add the second nameserver (ns2) so we have to click over the the "Name Server" icon.
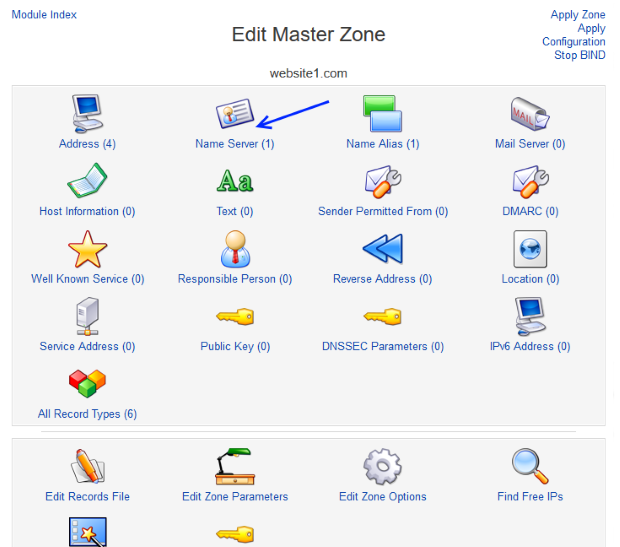
Fill the "Name Servers Records" like this :
Zone Name : leave empty
Name Server : ns2.website1.com. (IMPORTANT : Absolute names must end with a .)
Name Server : ns2.website1.com. (IMPORTANT : Absolute names must end with a .)
Hit the "Create" Button.

Click the "Return to record types" link.
It is time to add our mail server address by clicking at the "Mail Server" icon.
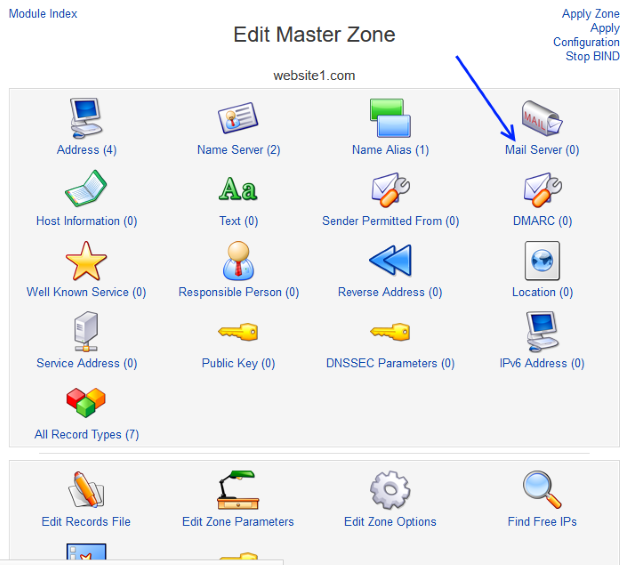
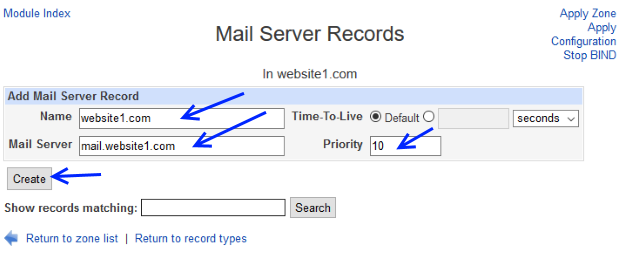
Fill the "Mail Server Records" like this :
Name : website1.com
Mail Server : mail.website1.com
Priority : 10 (10 is usually default). This is more of a concern if you are hosting a lot of domains.
Mail Server : mail.website1.com
Priority : 10 (10 is usually default). This is more of a concern if you are hosting a lot of domains.
Click on "Create" button.
Click "Return to Record Types" link.
From top right of the "Edit Master Zone" page click :
"Apply Configuration" link
Then click "Apply Zone" link
Then click "Stop BIND"
Finally click at "Start BIND" in order to restart BIND.
We have successfully set up our DNS Server.
In the next section we will see how to assign the new nameservers in order to be live online.
01-Introduction - 02-Installing Webmin - [[ 03-Configure DNS ]] - 04-Assign Nameservers - 05-Configure SFTP - 06-Setup Web server - 07-Let's Encrypt - 08-Setup Perl/CGI PHP - 09-Manage MySQL - 10-Setup Email server - 11-Setup SASL - 12-Setup Email accounts - 13-Email process - 14-Email antivirus - 15-Usermin - 16-Extras