


Configure a Dedicated Server with Webmin
Part 13 - Email Process
01-Introduction - 02-Installing Webmin - 03-Configure DNS - 04-Assign Nameservers - 05-Configure SFTP - 06-Setup Web server - 07-Let's Encrypt - 08-Setup Perl/CGI PHP - 09-Manage MySQL - 10-Setup Email server - 11-Setup SASL - 12-Setup Email accounts - [[ 13-Email process ]] - 14-Email antivirus - 15-Usermin - 16-ExtrasIn the last part we have set up successfully our email server.
Now as first step we will add a spam filter.
Install and configure Procmail
First of all we have to install Procmail.Procmail is a program for filtering, sorting and storing email. Install Procmail from Webmin as normally.
Notice that Procmail is included at the Webmin modules so you will not have any problems installing it. Another way to install procmail is via PuTTY using :
yum install procmail
Now log in using PuTTY and give the following command:
which procmail
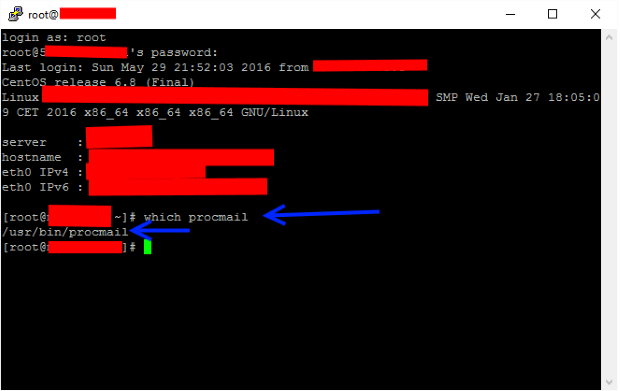
The output of the above command will give you the location of the Procmail binary, as follows:
/usr/bin/procmail
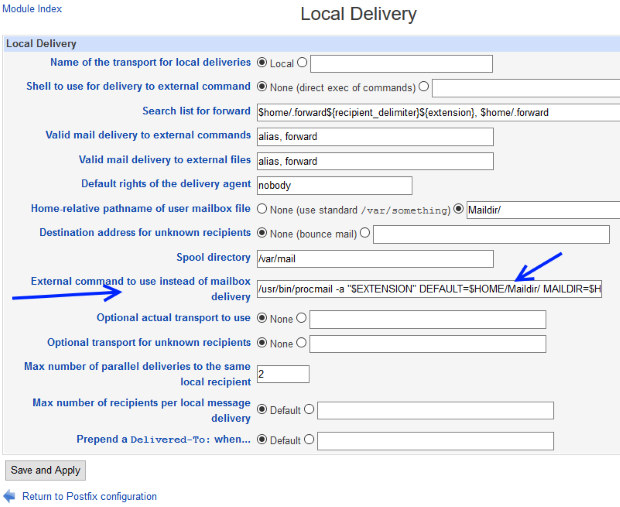
Now using Webmin navigate to Servers > Postfix Mail Server and click over the "Local Delivery" icon. Enter the following command in the "External command to use instead of mailbox delivery" text field.
/usr/bin/procmail -a "$EXTENSION" DEFAULT=$HOME/Maildir/ MAILDIR=$HOME/Maildir
Replace /usr/bin/procmail with your location if it's different.
Hit the "Save and Apply" button.
Install SpamAssassin
From PuTTY give:
yum install spamassassin
in order to install .
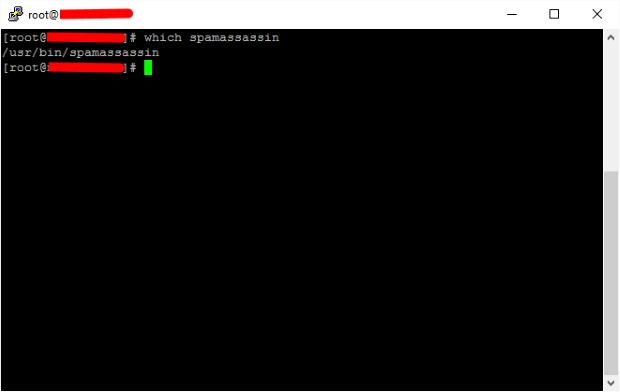
Now find the SpamAssassin's binary location as follows:
which spamassassin
In our case we got :
/usr/bin/spamassassin
Create anti-spam filters using Procmail
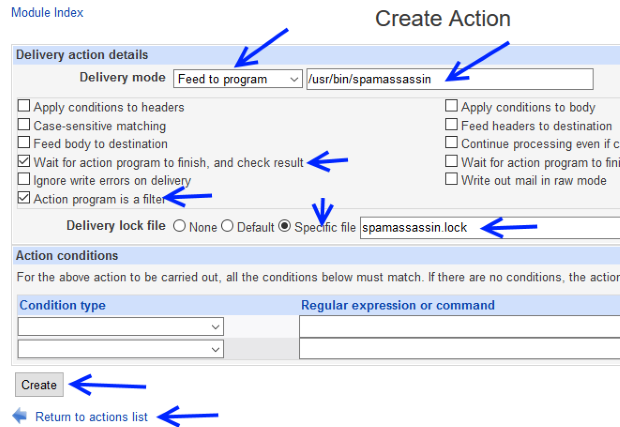
Navigate to Servers > Procmail Mail Filter.Click the "Add a new filter action" link.
Fill the "Create Action" form like this:
"Set Delivery mode" to Feed to program, and enter the path to the spamassassin
binary in the text field. In our case : /usr/bin/spamassassin
Mark the checkboxes :
Wait for action program to finish, and check result. Action program is a filter. Set "Delivery lock file" to Specific file, and enter spamassassin.lock in the text field.
Don't set any action conditions. We want to run all mail through Spamassassin.
Mark the checkboxes :
Wait for action program to finish, and check result. Action program is a filter. Set "Delivery lock file" to Specific file, and enter spamassassin.lock in the text field.
Don't set any action conditions. We want to run all mail through Spamassassin.
Click the "Create" button
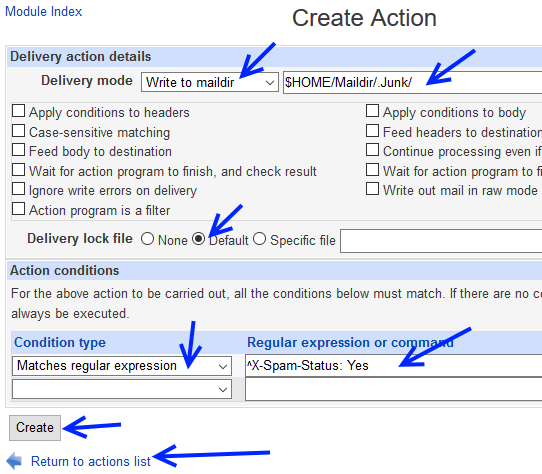
Let's create a second filter now, which will move all spam messages to another folder called Junk.
Click the "Add a new filter action link".
Fill the new "Create Action" form like this:
Set "Delivery mode" to Write to maildir. At the text field write $HOME/Maildir/.Junk/
Set "Delivery lock file" to Default.
Under Condition type, select Matches regular expression, and enter ^X-Spam-Status: Yes
Set "Delivery lock file" to Default.
Under Condition type, select Matches regular expression, and enter ^X-Spam-Status: Yes
Click the "Create" button
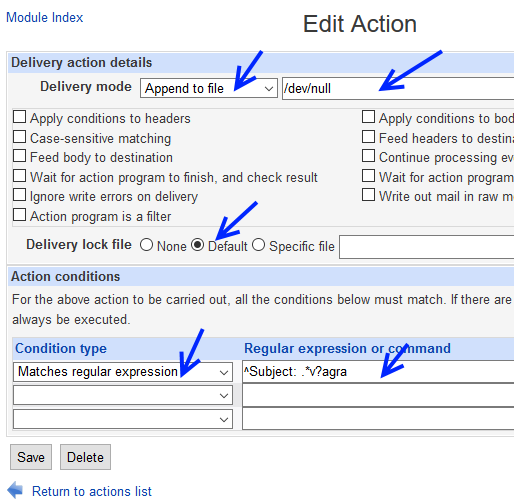
Let's create a third filter now, we want to delete completely every email has in the subject the word v*agra.
Click the "Add a new filter action link".
Fill the new "Create Action" form like this:
Set "Delivery mode" to Append to file. At the text field write /dev/null.
Set "Delivery lock file" to Default.
Under Condition type, select Matches regular expression, and enter ^Subject: .*v?agra
Set "Delivery lock file" to Default.
Under Condition type, select Matches regular expression, and enter ^Subject: .*v?agra
Click the "Create" button
Of course these are some filters you can add many more.
Configure Thunderbird to handle spam
In Thunderbird do:
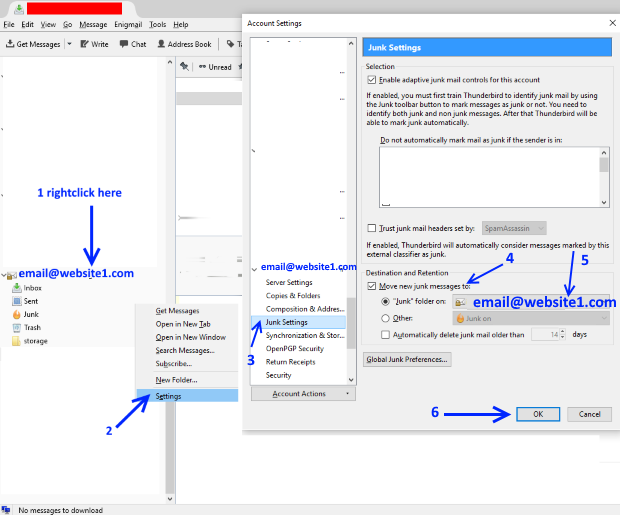
Right click the account email@website1.com > Settings > Junk settings
Check "Move new junk messages to:"
Select "Junk folder" on: "email@website1.com"
Press the "Ok" button
Check "Move new junk messages to:"
Select "Junk folder" on: "email@website1.com"
Press the "Ok" button
Testing the anti-spam protection
Once you have everything set up, you should test your anti-spam configuration. There is a way to trigger an automatic SpamAssassin high score.Using the "Generic Test for Unsolicited Bulk Email" string SpamAssassin should recognize it as spam.
So just enter the following string in a message, and it will be marked as spam:
XJS*C4JDBQADN1.NSBN3*2IDNEN*GTUBE-STANDARD-ANTI-UBE-TEST-EMAIL*C.34X
Mail it from an external email like yahoo to email@website1.com.
The email should automatically be placed at the Junk folder of Thunderbird.
In the next chapter we will see how to add an antivirus at our email system.
01-Introduction - 02-Installing Webmin - 03-Configure DNS - 04-Assign Nameservers - 05-Configure SFTP - 06-Setup Web server - 07-Let's Encrypt - 08-Setup Perl/CGI PHP - 09-Manage MySQL - 10-Setup Email server - 11-Setup SASL - 12-Setup Email accounts - [[ 13-Email process ]] - 14-Email antivirus - 15-Usermin - 16-Extras