Configure a Dedicated Server with Webmin
Part 06 - Apache Setup
01-Introduction - 02-Installing Webmin - 03-Configure DNS - 04-Assign Nameservers - 05-Configure SFTP - [[ 06-Setup Web server ]] - 07-Let's Encrypt - 08-Setup Perl/CGI PHP - 09-Manage MySQL - 10-Setup Email server - 11-Setup SASL - 12-Setup Email accounts - 13-Email process - 14-Email antivirus - 15-Usermin - 16-ExtrasNow we have to install a web server. This kind of server processes requests via HTTP.
You can see a web server like a computer that deliver HTML Web pages.
Apache is the most common web server.
Install Apache Server
Webmin has the "Apache Server" module located or at "Servers" section or at "Un-used Modules" section.If the server is not installed click on "Click here" link
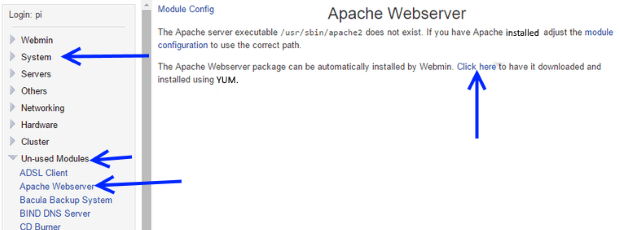
Configure Apache Server
Go to System > Bootup and ShutdownCheck the httpd checkbox and press the "Start Now and on Boot" button.
Every time that our server boots starts Apache web server.
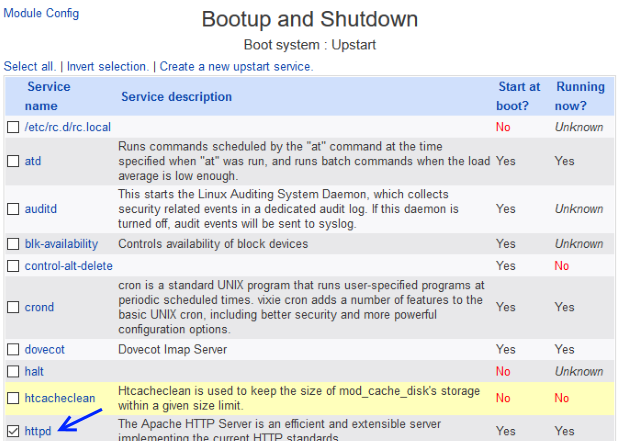
We can configure our web server by clicking Servers > Apache Webserver.
Click on "Start Apache" link located at the top right angle of your screen.
Now it is time to create a new Virtual Host.
We have to create one Virtual Host for each web site that we are going to host.
Virtual Host is a technology that allows from one IP to host multiple web sites.
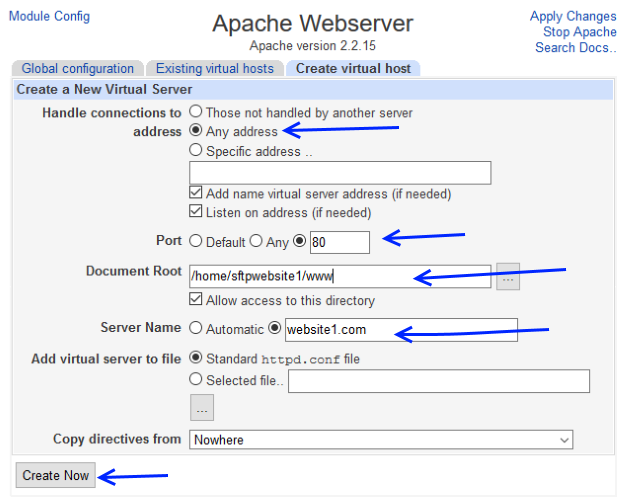
Click at "Create virualhost" tab.
Under "Create a New Virtual Server" do :
Handle connections to address : Select Any address
Port : 80
Document root : /home/sftpwebsite1/www
Allow access to this directory : checked
Server Name : website1.com
Hit the "Create now" button
Now select your newly created Virtual Host from the "Existing virtual hosts" list.

Hit the "Networking and Addresses" icon
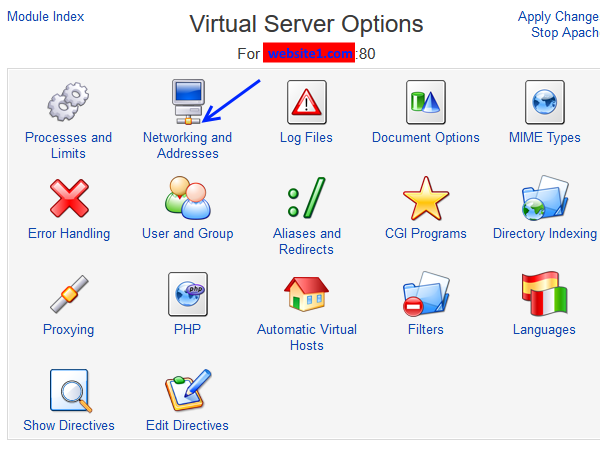
At the "Networkins and Addresses" page :
Go to Alternate virtual server names text area and write : *.website1.com
Make sure your Server hostname is : website1.com
Make sure your Server hostname is : website1.com
Hit the "Save" button.

Press the "Apply changes" link from the top/right corner of the page.
Now create a simple HTML file locally called "test.html" containing something like this :
<html>
<body>
<h1>website1 Test page !</h1>
</body>
</html>
<body>
<h1>website1 Test page !</h1>
</body>
</html>
Upload "test.html" via SFTP using FileZilla at the folder : /home/sftpwebsite1/www
Test that everything works using :
http://111.111.111.111/test.html Apache works.
http://www.website1.com/test.html DNS and Apache works.
http://www.website1.com/test.html DNS and Apache works.
Both of the links should work.
In order to enable multiple sites under the Port 80 :
Go to Servers > Apache Webserver and click over the "Global configuration" tab link, then press over "Edit Config Files" icon.
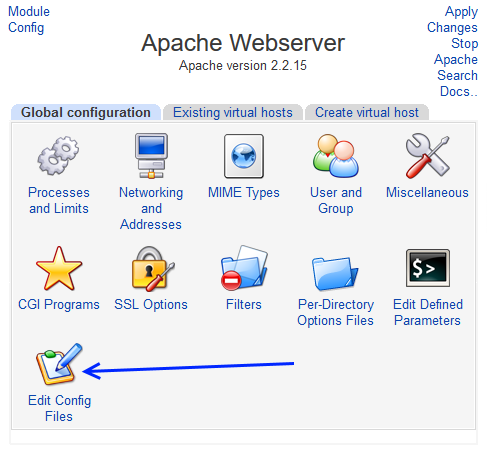
From the "Edit Confog Files" page :
Select : /etc/httpd/conf/httpd.conf
Hit the "Edit directives in File :" button.
Go to the bottom of the file and uncomment
NameVirtualHost *:80
Hit the "Edit directives in File :" button.
Go to the bottom of the file and uncomment
NameVirtualHost *:80
Hit the "Save" button.
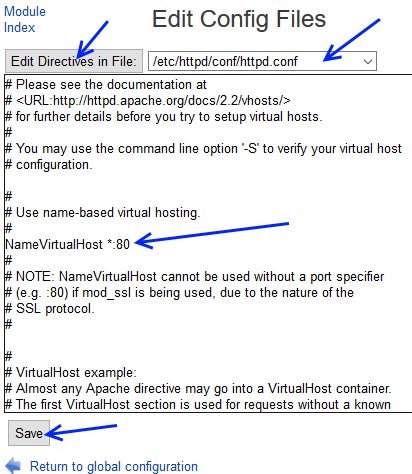
From the top right of the page click "Stop Apache" link and then "Start Apache" link in order to restart Apache web server.
Enable SSL Websites
In order to create https websites we have to install SSL into our system.The easiest way is to access at our dedicated server via PuTTY and send the command :
yum install mod_ssl
If we want to remove SSL we can do so by using the command :
yum -v remove mod_ssl
Now again go to Servers > Apache Webserver
From the top right of the page click "Stop Apache" link and then "Start Apache" link in order to restart Apache web server.
This action set ups one default virtual SSL host (Listening Port : 443).
With this configuration we can not use multiple SSL hosts.
Hit the "Apply changes" from the top/right corner of the page.
In order to enable multiple SSL sites under the Port 443 :
Go to Servers > Apache Webserver and click over the "Global configuration" tab link.
Click the "Edit Config Files" icon.
Select : /etc/httpd/conf.d/ssl.conf
Hit the "Edit directives in file" button.
Add :
# Use name-base virtual hosting
NameVirtualHost *:443
NameVirtualHost *:443
Before the :
##
## SSL Virtual Host Context
##
## SSL Virtual Host Context
##
Now hit the "Save" button.
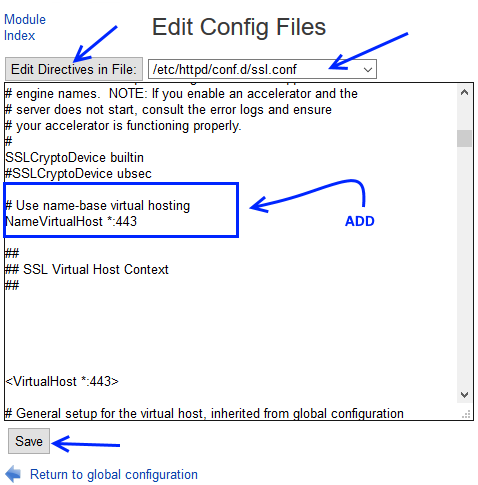
Copy into notepad the first and only Virtual host portion <VirtualHost *:443> ... </VirtualHost>.
Using notepad make the changes like below:
<VirtualHost *:443>

# General setup for the virtual host, inherited from global configuration
#DocumentRoot "/var/www/html"
#ServerName www.example.com:443
DocumentRoot /home/sftpwebsite1
ServerName website1.com
<Directory "/home/sftpwebsite1">
allow from all
Options None
</Directory>
ServerAlias *.website1.com

# Use separate log files for the SSL virtual host; note that LogLevel
# is not inherited from httpd.conf.
ErrorLog logs/ssl_error_log
TransferLog logs/ssl_access_log
LogLevel warn

#   SSL Engine Switch:
#   Enable/Disable SSL for this virtual host.
SSLEngine on

#   SSL Protocol support:
# List the enable protocol levels with which clients will be able to
# connect.  Disable SSLv2 access by default:
SSLProtocol all -SSLv2

#   SSL Cipher Suite:
# List the ciphers that the client is permitted to negotiate.
# See the mod_ssl documentation for a complete list.
SSLCipherSuite DEFAULT:!EXP:!SSLv2:!DES:!IDEA:!SEED:+3DES

#   Server Certificate:
# Point SSLCertificateFile at a PEM encoded certificate.  If
# the certificate is encrypted, then you will be prompted for a
# pass phrase.  Note that a kill -HUP will prompt again.  A new
# certificate can be generated using the genkey(1) command.
SSLCertificateFile /etc/pki/tls/certs/localhost.crt

#   Server Private Key:
#   If the key is not combined with the certificate, use this
#   directive to point at the key file.  Keep in mind that if
#   you've both a RSA and a DSA private key you can configure
#   both in parallel (to also allow the use of DSA ciphers, etc.)
SSLCertificateKeyFile /etc/pki/tls/private/localhost.key

#   Server Certificate Chain:
#   Point SSLCertificateChainFile at a file containing the
#   concatenation of PEM encoded CA certificates which form the
#   certificate chain for the server certificate. Alternatively
#   the referenced file can be the same as SSLCertificateFile
#   when the CA certificates are directly appended to the server
#   certificate for convinience.
#SSLCertificateChainFile /etc/pki/tls/certs/server-chain.crt

#   Certificate Authority (CA):
#   Set the CA certificate verification path where to find CA
#   certificates for client authentication or alternatively one
#   huge file containing all of them (file must be PEM encoded)
#SSLCACertificateFile /etc/pki/tls/certs/ca-bundle.crt

#   Client Authentication (Type):
#   Client certificate verification type and depth.  Types are
#   none, optional, require and optional_no_ca.  Depth is a
#   number which specifies how deeply to verify the certificate
#   issuer chain before deciding the certificate is not valid.
#SSLVerifyClient require
#SSLVerifyDepth  10

#   Access Control:
#   With SSLRequire you can do per-directory access control based
#   on arbitrary complex boolean expressions containing server
#   variable checks and other lookup directives.  The syntax is a
#   mixture between C and Perl.  See the mod_ssl documentation
#   for more details.
#<Location />
#SSLRequire (    %{SSL_CIPHER} !~ m/^(EXP|NULL)/ \
#            and %{SSL_CLIENT_S_DN_O} eq "Snake Oil, Ltd." \
#            and %{SSL_CLIENT_S_DN_OU} in {"Staff", "CA", "Dev"} \
#            and %{TIME_WDAY} >= 1 and %{TIME_WDAY} <= 5 \
#            and %{TIME_HOUR} >= 8 and %{TIME_HOUR} <= 20       ) \
#           or %{REMOTE_ADDR} =~ m/^192\.76\.162\.[0-9]+$/
#</Location>

#   SSL Engine Options:
#   Set various options for the SSL engine.
#   o FakeBasicAuth:
#     Translate the client X.509 into a Basic Authorisation.  This means that
#     the standard Auth/DBMAuth methods can be used for access control.  The
#     user name is the `one line' version of the client's X.509 certificate.
#     Note that no password is obtained from the user. Every entry in the user
#     file needs this password: `xxj31ZMTZzkVA'.
#   o ExportCertData:
#     This exports two additional environment variables: SSL_CLIENT_CERT and
#     SSL_SERVER_CERT. These contain the PEM-encoded certificates of the
#     server (always existing) and the client (only existing when client
#     authentication is used). This can be used to import the certificates
#     into CGI scripts.
#   o StdEnvVars:
#     This exports the standard SSL/TLS related `SSL_*' environment variables.
#     Per default this exportation is switched off for performance reasons,
#     because the extraction step is an expensive operation and is usually
#     useless for serving static content. So one usually enables the
#     exportation for CGI and SSI requests only.
#   o StrictRequire:
#     This denies access when "SSLRequireSSL" or "SSLRequire" applied even
#     under a "Satisfy any" situation, i.e. when it applies access is denied
#     and no other module can change it.
#   o OptRenegotiate:
#     This enables optimized SSL connection renegotiation handling when SSL
#     directives are used in per-directory context.
#SSLOptions +FakeBasicAuth +ExportCertData +StrictRequire
<Files ~ "\.(cgi|shtml|phtml|php3?)$">
    SSLOptions +StdEnvVars
</Files>
<Directory "/var/www/cgi-bin">
    SSLOptions +StdEnvVars
</Directory>

#   SSL Protocol Adjustments:
#   The safe and default but still SSL/TLS standard compliant shutdown
#   approach is that mod_ssl sends the close notify alert but doesn't wait for
#   the close notify alert from client. When you need a different shutdown
#   approach you can use one of the following variables:
#   o ssl-unclean-shutdown:
#     This forces an unclean shutdown when the connection is closed, i.e. no
#     SSL close notify alert is send or allowed to received.  This violates
#     the SSL/TLS standard but is needed for some brain-dead browsers. Use
#     this when you receive I/O errors because of the standard approach where
#     mod_ssl sends the close notify alert.
#   o ssl-accurate-shutdown:
#     This forces an accurate shutdown when the connection is closed, i.e. a
#     SSL close notify alert is send and mod_ssl waits for the close notify
#     alert of the client. This is 100% SSL/TLS standard compliant, but in
#     practice often causes hanging connections with brain-dead browsers. Use
#     this only for browsers where you know that their SSL implementation
#     works correctly.
#   Notice: Most problems of broken clients are also related to the HTTP
#   keep-alive facility, so you usually additionally want to disable
#   keep-alive for those clients, too. Use variable "nokeepalive" for this.
#   Similarly, one has to force some clients to use HTTP/1.0 to workaround
#   their broken HTTP/1.1 implementation. Use variables "downgrade-1.0" and
#   "force-response-1.0" for this.
SetEnvIf User-Agent ".*MSIE.*" \
         nokeepalive ssl-unclean-shutdown \
         downgrade-1.0 force-response-1.0

#   Per-Server Logging:
#   The home of a custom SSL log file. Use this when you want a
#   compact non-error SSL logfile on a virtual host basis.
CustomLog logs/ssl_request_log \
          "%t %h %{SSL_PROTOCOL}x %{SSL_CIPHER}x \"%r\" %b"

</VirtualHost>
<VirtualHost *:443> ... </VirtualHost>
Now paste the newly changed <VirtualHost *:443> ... </VirtualHost> portion at your /etc/httpd/conf.d/ssl.conf file.
Press the "Save" Button.
For each new virtual host SSL you should clone (copy/paste) the <VirtualHost *:443> ... </VirtualHost> portion changing the bold strings.
Example :
<VirtualHost *:443>

# General setup for the virtual host, inherited from global configuration
#DocumentRoot "/var/www/html"
#ServerName www.example.com:443
DocumentRoot /home/sftpwebsite1
ServerName website1.com
<Directory "/home/sftpwebsite1">
allow from all
Options None
</Directory>
ServerAlias *.website1.com
...
...
...
</VirtualHost>

<VirtualHost *:443>

# General setup for the virtual host, inherited from global configuration
#DocumentRoot "/var/www/html"
#ServerName www.example.com:443
DocumentRoot /home/sftpwebsite2
ServerName website2.com
<Directory "/home/sftpwebsite2">
allow from all
Options None
</Directory>
ServerAlias *.website2.com
...
...
...
</VirtualHost>
Do not forget to hit apply changes and stop/start (restart) the Apache Webserver.
Go to Servers > Apache Webserver
By clicking the "Existing virtual hosts" you should see all your Virtual Hosts like the photo below:
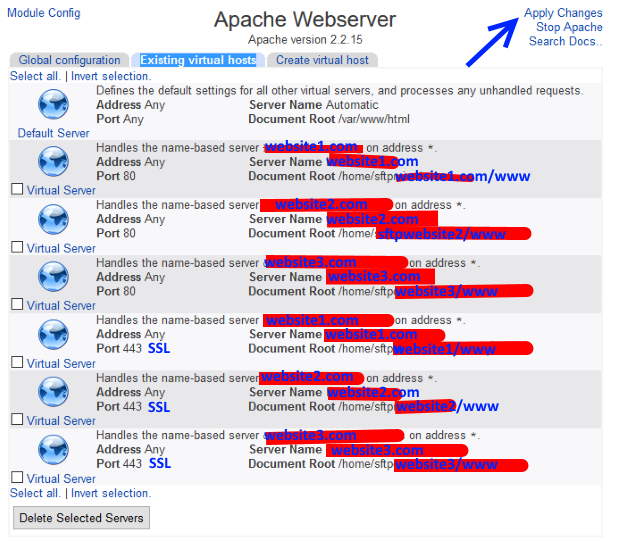
In order to test your SSL websites test on your browser these links :
https://www.website1.com/test.html (DNS and Apache works)
https://www.website2.com/test.html (DNS and Apache works)
https://www.website2.com/test.html (DNS and Apache works)
Enabling .htaccess
In order to enable .htaccess into a virtual server click on the virtual server then hit "Edit Directives icon" and change this :
allow from all
Options None
Options None
into :
Options -Indexes FollowSymLinks -MultiViews
AllowOverride All
Order allow,deny
allow from all
AllowOverride All
Order allow,deny
allow from all
Full example :
DocumentRoot /home/sftpwebsite1/www
ServerName website1.com
<Directory "/home/sftpwebsite1/www">
Options -Indexes FollowSymLinks -MultiViews
AllowOverride All
Order allow,deny
allow from all
</Directory>
ServerAlias *.website1.com
LogLevel emerg
TransferLog /home/sftpwebsite1/logs/access_log
ServerName website1.com
<Directory "/home/sftpwebsite1/www">
Options -Indexes FollowSymLinks -MultiViews
AllowOverride All
Order allow,deny
allow from all
</Directory>
ServerAlias *.website1.com
LogLevel emerg
TransferLog /home/sftpwebsite1/logs/access_log
Now restart the Apache web server.
In order to test .htaccess do like so:
Create an empty .htaccess file and add this code:
RewriteEngine On
RewriteBase /

#http://website1.com -> http://www.website1.com
RewriteCond %{SERVER_PORT} 80
RewriteCond %{HTTP_HOST} !^www\.
RewriteRule ^(.*)$ http://www.%{HTTP_HOST}%{REQUEST_URI} [L,R=301]

#https://website1.com -> https://www.website1.com
RewriteCond %{SERVER_PORT} 443
RewriteCond %{HTTP_HOST} !^www\.
RewriteRule ^(.*)$ https://www.%{HTTP_HOST}%{REQUEST_URI} [L,R=301]
Upload ".htaccess" using FileZilla at the folder : /home/sftpwebsite1/www
Now if a user goes: http://website1.com gets redirected at http://www.website1.com
The same is valid for the SSL flavour of the site:
So if the user goes: https://website1.com gets redirected at https://www.website1.com
If we want to direct all of our traffic via SSL then we have to modify our ".htaccess" file like this:
RewriteEngine On
RewriteBase /

# force ssl http -> https
RewriteCond %{SERVER_PORT} 80
RewriteRule ^(.*)$ https://%{SERVER_NAME}%{REQUEST_URI} [L,R=301]

#https://website1.com -> https://www.website1.com
RewriteCond %{SERVER_PORT} 443
RewriteCond %{HTTP_HOST} !^www\.
RewriteRule ^(.*)$ https://www.%{HTTP_HOST}%{REQUEST_URI} [L,R=301]
Now if a user goes: http://website1.com gets redirected at https://www.website1.com
For the SSL flavour of the site:
if the user goes: https://website1.com gets redirected at https://www.website1.com
In the next section we will see how to create a free SSL Certificate for our website using Let's Encrypt
01-Introduction - 02-Installing Webmin - 03-Configure DNS - 04-Assign Nameservers - 05-Configure SFTP - [[ 06-Setup Web server ]] - 07-Let's Encrypt - 08-Setup Perl/CGI PHP - 09-Manage MySQL - 10-Setup Email server - 11-Setup SASL - 12-Setup Email accounts - 13-Email process - 14-Email antivirus - 15-Usermin - 16-Extras